Showing posts with label grails. Show all posts

Monday, August 28, 2023

Caused by java.io.IOException: CreateProcess error=206, The filename or extension is too long

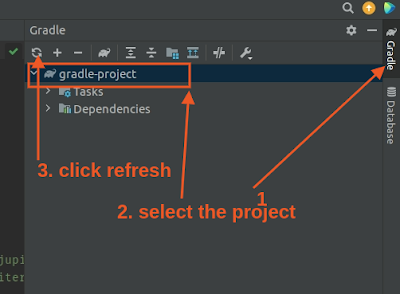
While working on Java gradle project sometimes we might get the following error in Windows system:

Caused by: java.io.IOException: CreateProcess error=206, The filename or extension is too long

This is due to when classpath for a Gradle JavaExec or Test task is long, Windows command executions give error because of limitation to command line length greater than 32K

With a number of classpath dependencies in a large project, typically JavaExec Gradle task fails with error "The filename or extension is too long" and this would be a stopping error. To solve this issue, we can use the following gradle plugin. Use the plugin inside build.gradle file

apply plugin: "com.virgo47.ClasspathJar"

Or we can use inside build.gradle file under buildscript {} >> dependencies {} section as below:

buildscript {
  repositories {
    maven {
      url "https://plugins.gradle.org/m2/"
    }
  }
  dependencies {
    classpath "gradle.plugin.com.virgo47.gradle:ClasspathJar:1.0.0"
  }
}

For Kotlin project, use it inside build.gradle.kts file as below:

apply(plugin = "com.virgo47.ClasspathJar")

Or we can use it in the build.gradle.kts kotlin file under buildscript {} >> dependencies {}

buildscript {
  repositories {
    maven {
      url = uri("https://plugins.gradle.org/m2/")
    }
  }
  dependencies {
    classpath("gradle.plugin.com.virgo47.gradle:ClasspathJar:1.0.0")
  }
}

ClasspathJar plugin creates a classpath jar for jar files in the classpath and sets the classpath with classpath jar. This includes JavaExec, Test and other similar tasks.

Build the application and run it.

Reference: ClasspathJar

Share:

Tuesday, August 16, 2022

Convert Date to Pretty Time in Grails and Groovy

In this tutorial, we will learn how to convert Java Date to pretty time like moments ago, 1 hour ago, 1 week ago, 1 month ago, 1 year ago, and so on in grails application.

For this, we are using the prettytime plugin in our project.

Load PrettyTime in Grails Gradle project:

Add the following inside dependencies in the build.gradle file.

dependencies {
//other dependencies
 
compile 'org.grails.plugins:grails-pretty-time:4.0.0'
}

PrettyTime format Date:

Now let's create a method that formats the Java Date

import org.ocpsoft.prettytime.PrettyTime
import java.util.Date
public static String formatPrettyTime(Date date) {
        PrettyTime p = new PrettyTime()
        return p.format(date).trim()
    }

This will format the given date to a pretty time like moments ago.

Pretty Time Support Locale:

Prettytime support different language, for this use request to get the current locale and format it.

public static String formatPrettyTime(Date date, request) {
        Locale locale = RequestContextUtils.getLocale(request)
        PrettyTime prettyTime = new PrettyTime(locale)
        return prettyTime.format(date).trim()
    }

Here, we are using the locale from the request which gives the session locale for the current user

Current locale in grails application can also be achieved using LocaleContextHolder

import org.springframework.context.i18n.LocaleContextHolder
Locale locale = LocaleContextHolder.getLocale()

For pretty time supported language please follow prettyTime

Use in Gsp page:

If we are using the GSP pages HTML as server-side rendering, then we can use pretty time in GSP pages as below

<prettytime:display date="${someDate}" />
Share:

Tuesday, July 26, 2022

Setup Http client for API using OkHttp in Java

In this tutorial, we will learn how to use OkHttp for HTTP requests while consuming APIs.

OkHttp is an HTTP client which will do HTTP efficiently by loading faster and saving bandwidth. Using OkHttp is easy. Its request/response API is designed with fluent builders and immutability. It supports both synchronous blocking calls and async calls with callbacks.

Setup the OkHttp dependency:

If we are using the external Jar file, download the jar from okhttp maven.

Follow this tutorial for setting up the Jar file How to add external jar or library on IntelliJ IDEA project

Setup in maven project:

Add in pom.xml

<dependency>
    <groupId>com.squareup.okhttp3</groupId>
    <artifactId>okhttp</artifactId>
    <version>4.10.0</version>
</dependency>

Setup in Gradle project:

Add in build.gradle under "dependencies"

dependencies {
//other dependencies
 
compile("com.squareup.okhttp3:okhttp:4.10.0")
}

Implementation:

Let's create a sample java class HttpClient.java and set up the OkHttp3 client.

import okhttp3.MediaType
import okhttp3.OkHttpClient
import okhttp3.Request
import okhttp3.RequestBody
import okhttp3.Response

class HttpClient {

    public static final MediaType JSON = MediaType.get("application/json; charset=utf-8")


    public static Response doGetRequest(url, String apiKey = '') {
        Request.Builder requestBuilder = new Request.Builder()
                .url(url)
        Request request = setHeadersConfig(requestBuilder, apiKey).build();
        Response response = getClient().newCall(request).execute()
        return response.body().string();
    }

    public static String doPostRequest(String json, String url, String apiKey = '') {
        RequestBody body = RequestBody.create(json, JSON)
        Request.Builder requestBuilder = new Request.Builder()
                .url(url)
                .post(body)
        Request request = setHeadersConfig(requestBuilder, apiKey).build();
        Response response = getClient().newCall(request).execute()
        return response.body().string()
    }

    public static String doDeleteRequest(String json, String url, String apiKey = '') {
        RequestBody body = RequestBody.create(json, JSON)
        Request.Builder requestBuilder = new Request.Builder()
                .url(url)
                .delete(body)
        Request request = setHeadersConfig(requestBuilder, apiKey).build();
        Response response = getClient().newCall(request).execute()
        return response.body().string()
    }

    private static Request.Builder setHeadersConfig(Request.Builder requestBuilder, String apiKey) {
        requestBuilder.header("Content-Type", "application/json")
                .header("X-MBX-APIKEY", apiKey)
        return requestBuilder
    }

    private static OkHttpClient getClient() {
        return new OkHttpClient()
    }
}

This class contains the setup for the post, get and delete request.

Method setHeadersConfig is for setting up the headers we used sample X-MBX-APIKEY header configuration to set the API key. You can use your desired header configuration there.

We can pass the post body by formatting the data in JSON string.

Please don't forget to handle the Exception.

Getting Status Code:

We can get the status code from the Response response object in the above example as below:

 Response response = getClient().newCall(request).execute()
        int statusCode = response.code()

Using it from Java classes:

All the methods are static so we can simply use it from other java classes as below:

HttpClient.doPostRequest(json, url, apiKey)
Share:

Sunday, July 24, 2022

How to parse JSON string to Object and vice versa in Groovy Grails application

In this tutorial, we will learn how to parse or convert the object to JSON string and JSON string to object.

Convert Object to JSON String:

Let's look into the example, here we will parse the Map to JSON string.

Map mapToConvert = [username : "Test", phonenumber : "+10656564"]
List listToConvert = ["Test", "+10656564"]

Now, let's convert to JSON string using JSON class

import grails.converters.JSON
        Map mapToConvert = [username : "Test", phonenumber : "+10656564"]
        List listToConvert = ["Test", "+10656564"]
        String jsonStringFromMap =  (mapToConvert as JSON).toString()
        String jsonStringFromList =  (listToConvert as JSON).toString()
        

You can use any other object data type to convert as above

Convert JSON String to Object:

For converting JSON string to object we are using JsonSlurper as below:

import grails.converters.JSON
import groovy.json.JsonSlurper
		Map mapToConvert = [username : "Test", phonenumber : "+10656564"]
        List listToConvert = ["Test", "+10656564"]
        String jsonStringFromMap =  (mapToConvert as JSON).toString()
        String jsonStringFromList =  (listToConvert as JSON).toString()
        Map convertedMap = parseTo(jsonStringFromMap)
        List convertedList = parseTo(jsonStringFromList)
        
        private static def parseTo(String jsonString) {
        return new JsonSlurper().parseText(jsonString)
    }
        
Share:

Thursday, July 7, 2022

How to use custom validation class in Grails Application

In this tutorial, we will learn how to add custom validation in the Grails application.

Grails domain classes support the validation by default. So we can simply add the constrains for the domain classes fields as below

class User {
    String username
    String password
    String email
    Integer age
    
    
	static constraints = {
        username blank: false, unique: true
        password size: 5..15, blank: false
        email email: true, blank: false
        age min: 18
	}
}

Now we can simply validate the object using validate() or hasErrors() methods

User user = new User(params) // map the request parameters to user object
if (!user.validate()) {
    // format errors and send to the client
}
User user = new User(params) // map the request parameters to user object
if (user.hasErrors()) {
    // format errors and send to the client
}

Now, let's say that we want to validate some non-domain fields or use a custom validation class to validate the request parameter sent by the user.

We can do so by implementing Validateable trait so that we can add the constrain for the fields in the custom class. Let's look into the example

import grails.validation.Validateable

class UserCommand implements Validateable {

    public static final emailRegex = "^\\w+([\\.-]?\\w+)*@\\w+([\\.-]?\\w+)*(\\.\\w{2,3})+\$"

    UserCommand(def requestParams) {
        email = requestParams.email
        password = requestParams.password
        username = requestParams.username
        age = requestParams.age
    }

    static constraints = {
        username blank: false, unique: true
        password size: 5..15, blank: false
        email email: true, blank: false, validator: emailValidator
        age min: 18
    }
    
    static emailValidator = { String value, UserCommand command ->
        if (!value.find(emailRegex)) {
            return "email.invalid" // getting message from message.properties file
        }
    }
}

In the above example, we can add the constraints after implementing the Validateable on the custom class and do the validation logic similar to the domain classes validation.

Now, let's utilize the above command class inside the controller.

UserCommand userCommand = new UserCommand(requestParams)
        if (!userCommand.validate()) {
            Map result = [success: false, errors: []]
            result.errors = getCommandErrors(userCommand)
            render(result as JSON)
            return
        }
def messageSource

public static List getCommandErrors(def command) {
        List errors = []
        command.errors.allErrors.each { ObjectError error ->
            String msg = messageSource.getMessage(error.code, error.arguments, error.defaultMessage)
            errors.add(msg)
        }
        return errors
    }

For more details visit Grails Validation

Share:

Wednesday, July 6, 2022

How to enable CORS in Grails Application

In this tutorial, we are going to learn how to enable the cross-origin resources sharing CORS in a Grail Application.

Introduction:

Cross-origin resource sharing is the way to trust between the two web services or applications. So if the two web services don't satisfy then a CORS issue may arise.

Cors is a mechanism for the web application that controls listening to certain request from other web applications which is not hosted on the same server. It will not grant access to the content from other applications. So, in order to interact between two different web applications, we need to enable the Cors for that particular app.

Enable CORS in Grails Application:

We can enable cors in application.yml as below

grails:
    cors:
        enabled: true

The above configuration enables the cors for all the origins i.e all applications can interact with our application.

Enable Cors for a specific domain:

application.yml

grails:
    cors:
        enabled: true
        allowedOrigins:
            - https://example.com

This will allow the request only for the domain example.com

Enable Cors for specific requests or URLs:

application.yml

grails:
    cors:
        enabled: true
        allowedHeaders:
            - Content-Type
        mappings:
            '[/api/**]':
                allowedOrigins:
                    - https://example.com

This will allow all the requests from URLs that start with /api for example.com domain. Note that the mapping key must be made with bracket notation i.e [/api/**]

For more detail please visit Grails CORS.

Share:

Saturday, July 2, 2022

Error: Could not find or load main class org.grails.cli.GrailsCli

This is a quick tutorial on how we can resolve the issue on the Grails project.

For grails application sometimes we might get the following error

Error: Could not find or load main class org.grails.cli.GrailsCli

This might be due to the removal of some dependencies or libraries from the application. Sometimes, while loading multiple applications from IDE while downloading the library for a particular project other libraries for another project might remove so this kind of error might occurs for that project.

Let's first delete the build folder under the application.

Now, let's refresh the Gradle project. Here we are using IntelliJ Idea, we can refresh the project as below

After refreshing the project it will download the missing dependencies. Then run the application which will resolve the problem.

We can also try cleaning the application.

If we are using the command line then type the following command to clean the application.

grails clean

If we are using the IntelliJ idea then Ctr+Alt+G opens the command window and use the following command.

clean

Now, re-run the app. This will help resolve the issue.

Share:

Wednesday, June 29, 2022

How to use SiftingAppender in Gradle Groovy project

 In this tutorial, we are going to set up the SiftingAppender in our Gradle Groovy project.

Sifting Appender is useful when we want to separate the log files during runtime i.e if we want to separate the log files per thread or per user session basis.

Unfortunately, in the Gradle Groovy project, SiftingAppender is no longer supported since version 1.0.12 as mentioned in Groovy Configuration.

Let's look into the simple example where we are going to configure the SiftingAppender in logback.groovy, where we want to configure the per-user logging mechanism.

import ch.qos.logback.classic.PatternLayout
import ch.qos.logback.classic.sift.MDCBasedDiscriminator
import ch.qos.logback.classic.sift.SiftingAppender

appender("USER_ROLLING", SiftingAppender) {
    discriminator(MDCBasedDiscriminator) {
        key = 'userid'
        defaultValue = 'NONE'
    }
    sift {
        appender("FILE-${userid}", FileAppender) {
            file = "Path-to-log/${userid}.log"
            append = true
            layout(PatternLayout) {
                pattern = "%level %logger - %msg%n"
            }
        }
    }
}
logger("package-to-log",TRACE,['USER_ROLLING'], false)

This is a simple example SiftingAppender configuration; this is derived from logback sifting appender xml configuration.

We are using the Mapped Diagnostic Context for mapping the context user to create a separate file. We can do a similar for the thread as well.

Let's set up the MDC for user, the sample example looks as below.

import groovy.util.logging.Slf4j
import org.slf4j.MDC
@Slf4j
class UserLogging {

    public static void debug(String message, String userid = '') {
        setUserMDC(userid)
        log.debug(message)
    }

    public static void error(String message, String userid = '') {
        setUserMDC(userid)
        log.error(message)
    }

    public static void info(String message, String userid = '') {
        setUserMDC(userid)
        log.info(message)
    }

    public static void setUserMDC(String userid) {
        try {
            if (!userid) {
                MDC.remove("userid")
                return
            }
            MDC.put("userid", userid)
        }catch(e) {
            log.error("Error setting user Mapped Diagnostic Context due to "+e.getMessage())
        }
    }
}

Here, if the userid is available then we are setting the MDC for userid so the log file can be written in a separate file per user. If you want to do with request user do the similar in filter class or the place where it suits.

Now, if we run the application we will get the error as a result the appender doesn't work. So, here we found the solution project that extends Logback Gaffer so that SiftingAppender can be configured in Groovy DSL from this Github repo.

Simply download the jar file for that project and add it to the application.

For the Gradle project create a libs directory under the project directory and load and compile from build.gradle file.

Under build.gradle under dependencies{} section:

compile fileTree(dir: 'libs', include: '*.jar')

If we run the application it suppose to work. The log file will be created on the respective file path.

Share:

Saturday, January 22, 2022

Grails 3 Download Saved Documnets/Files (.pdf, .txt, .docx and others) Example.

How to Download different types of files using Grails 3.

If you want to use server-side file download for different types of files like pdf, txt, docx etc then there are different ways to do it.

We can use ServletOutputStream object for it as below:

    def download(){
            def filePath = "/opt/tomcat/webapps/savedFile/filename.pdf" //I am saving files on tomcat.
            def file = new File(filePath)
            if (file.exists()){
                response.setContentType("application/octet-stream")
                response.setHeader("Content-disposition", "filename=${file.getName()}")
                response.outputStream << file.bytes
            }else {
                //handle file not found messages.
            }
}
Here, contentType is "application/octet-stream" for all types of file. If you want to specified for specific one set contentType for specific one.
                response.setContentType("application/pdf")
Or you can do simply like this:

    def download(){
            def filePath = "/opt/tomcat/webapps/savedFile/filename.pdf" //I am saving files on tomcat.
            def file = new File(filePath)
            if (file.exists()){
                response.setContentType("application/octet-stream")
                response.setHeader("Content-disposition", "filename=${file.getName()}")
                response.outputStream << file.newInputStream()
            }else {
                //handle file not found messages.
            }
}
def download(){
            def filePath = "/opt/tomcat/webapps/savedFile/filename.pdf" //I am saving files on tomcat.
            def file = new File(filePath)
            if (file.exists()){
                response.setContentType("application/octet-stream")
                response.setHeader("Content-disposition", "filename=${file.getName()}")
                def outputStream = response.getOutputStream()
                outputStream << file.bytes
                outputStream.flush()
                outputStream.close()
            }else {
                //handle file not found messages.
            }
}
But in grails 3 latter version while deploying the war file to external tomcat(tomcat 7) server then we might get some class not found issue while downloading files.
Error 500: Internal Server Error
URI
/patient/download
Class
java.lang.ClassNotFoundException
Message
Handler dispatch failed; nested exception is java.lang.NoClassDefFoundError: javax/servlet/WriteListener
Caused by
javax.servlet.WriteListener
In order to solve this issue, we need to make the controller's action wrap with @GrailsCompileStatic annotation.
import grails.compiler.GrailsCompileStatic

@GrailsCompileStatic
def download(){
            def filePath = "/opt/tomcat/webapps/savedFile/filename.pdf" //I am saving files on tomcat.
            def file = new File(filePath)
            if (file.exists()){
                response.setContentType("application/octet-stream")
                response.setHeader("Content-disposition", "filename=${file.getName()}")
                def outputStream = response.getOutputStream()
                outputStream << file.bytes
                outputStream.flush()
                outputStream.close()
            }else {
                //handle file not found messages.
            }
}
Share:

Securing Grails Application with Spring Security Rest | Rest API | Grails 3.x

How to Secure Grails Application with Spring Security Rest in Grails 3


Introduction:

In this tutorial, we are going to secure our grails application with spring security simply refer to spring security rest login. Here we are using grails version 3.3.0 and Java 8. This tutorial describes the configuration of Spring Security Core, Spring Security Rest with Grails 3 to secure the application.

Pre-requisites:
  1. Running Java
  2. Running Grails
Create Grails Application:


1. Create App

In order to create grails application, open your terminal or cmd and type following command to create an app.
grails create-app spring-security-rest --profile rest-api

// Application created at (path of app)
Open your favorite text editor or IDE and open the project that we recently created.

Go to a created project folder.
cd spring-security-rest
Run grails interactive mode.
grails 
In order to run and stop an application simply type "run-app" and "stop-app"

2. Create Domain Class

Let's create a dummy class to test security called "Product". You can use either terminal or your IDE.
create-domain-class Product
Add some properties in the domain class.
class Product {
    String name
    Double price
    String companyName
    String description
    Date dateCreated = new Date()
    static constraints = {
    }
}
Add some data using BootStrap.groovy
class BootStrap {

    def init = { servletContext ->
        if (Product.count() == 0){
            new Product(name: "product1", price: 10, companyName: "company1", description:"description1").save(flush:true)
            new Product(name: "product2", price: 100, companyName: "company2", description:"description2").save(flush:true)
            new Product(name: "product3", price: 1000, companyName: "company3", description:"description3").save(flush:true)
            new Product(name: "product4", price: 10000, companyName: "company4", description:"description4").save(flush:true)
        }
    }
    def destroy = {
    }
}
Create Controller for product domain.
create-restful-controller Product
It will create controller like this:
class ProductController extends RestfulController {
    static responseFormats = ['json', 'xml']
    ProductController() {
        super(Product)
    }
}
Run application. And simply make get request, as following endpoint will results "product" data in Json format that we created in BootStrap.groovy.
http://localhost:8080/product


Spring Security Core Plugin Configuration:

Under build.gradle file within dependencies add the following configuration and run command "compile"
dependencies {
    compile 'org.grails.plugins:spring-security-core:3.2.0'
}
Now its time to create user related tables,  for this exit from the interactive console.
exit
grails s2-quickstart spring.security.rest User Role
You can see:
CONFIGURE SUCCESSFUL
Total time: 2.965 secs
| Creating User class 'User' and Role class 'Role' in package 'spring.security.rest'
| Rendered template PersonWithoutInjection.groovy.template to destination grails-app/domain/spring/security/rest/User.groovy
| Rendered template PersonPasswordEncoderListener.groovy.template to destination src/main/groovy/spring/security/rest/UserPasswordEncoderListener.groovy
| Rendered template Authority.groovy.template to destination grails-app/domain/spring/security/rest/Role.groovy
| Rendered template PersonAuthority.groovy.template to destination grails-app/domain/spring/security/rest/UserRole.groovy
| 
************************************************************
* Created security-related domain classes. Your            *
* grails-app/conf/application.groovy has been updated with *
* the class names of the configured domain classes;        *
* please verify that the values are correct.               *
************************************************************
Which will create User.groovy, Role.groovy, and UserRole.groovy Domain classes.

Now let's create a user data for testing purpose using BootStrap.groovy.
def role1 = new Role(authority:"ROLE_USER").save flush:true
        def user1 = new User(username:"user@gmail.com",password:"pwd@123").save flush:true
        UserRole.create(user1,role1)
Spring Security Rest Plugin Configuration:
Under build.gradle file within dependencies add the following configuration and run command "compile"
dependencies {
    compile "org.grails.plugins:spring-security-rest:2.0.0.M2"
}
Go to application.groovy and add chainMap configuration:
grails.plugin.springsecurity.filterChain. chainMap = [
  [pattern: '/**',filters: 'JOINED_FILTERS,-anonymousAuthenticationFilter,-exceptionTranslationFilter,-authenticationProcessingFilter,-securityContextPersistenceFilter'],
  [pattern: '/**', filters: 'JOINED_FILTERS,-restTokenValidationFilter,-restExceptionTranslationFilter'] 
]
Note: If your endpoint start with https://address.com/api or /othername then your chainMap look like
grails.plugin.springsecurity.filterChain. chainMap = [
  [pattern: '/api**',filters: 'JOINED_FILTERS,-anonymousAuthenticationFilter,-exceptionTranslationFilter,-authenticationProcessingFilter,-securityContextPersistenceFilter'],
  [pattern: '/**', filters: 'JOINED_FILTERS,-restTokenValidationFilter,-restExceptionTranslationFilter'] 
]


The final configuration looks like

// Added by the Spring Security Core plugin:
grails.plugin.springsecurity.userLookup.userDomainClassName = 'spring.security.rest.User'
grails.plugin.springsecurity.userLookup.authorityJoinClassName = 'spring.security.rest.UserRole'
grails.plugin.springsecurity.authority.className = 'spring.security.rest.Role'
grails.plugin.springsecurity.controllerAnnotations.staticRules = [
 [pattern: '/',               access: ['permitAll']],
 [pattern: '/error',          access: ['permitAll']],
 [pattern: '/index',          access: ['permitAll']],
 [pattern: '/index.gsp',      access: ['permitAll']],
 [pattern: '/shutdown',       access: ['permitAll']],
 [pattern: '/assets/**',      access: ['permitAll']],
 [pattern: '/**/js/**',       access: ['permitAll']],
 [pattern: '/**/css/**',      access: ['permitAll']],
 [pattern: '/**/images/**',   access: ['permitAll']],
 [pattern: '/**/favicon.ico', access: ['permitAll']],
 [pattern: '/**',             access: ['isFullyAuthenticated()']]
]

grails.plugin.springsecurity.filterChain. chainMap = [
  [pattern: '/**',filters: 'JOINED_FILTERS,-anonymousAuthenticationFilter,-exceptionTranslationFilter,-authenticationProcessingFilter,-securityContextPersistenceFilter'],
  [pattern: '/**', filters: 'JOINED_FILTERS,-restTokenValidationFilter,-restExceptionTranslationFilter'] 
]


Testing Secured REST API:
Now re-run the application and request the endpoint "http://localhost:8080/product"


which is our application is secured. I will make a tutorial for customizing this message format.

Next test the login endpoint with our existing user created in BootStrap.groovy. Here I am using Post-man.
Now access data via authorization.

Here, for authorization key use "Bearer access_token". You can see data as shown above. Because in our application.groovy we configure in such a way that all the login users can access data.
[pattern: '/**',             access: ['isFullyAuthenticated()']]
In the next tutorial I am going to create different customization for configuration and describe about different annotations.

Share:

Friday, January 21, 2022

Splitting resources.groovy configuration in Grails applications

Splitting resources.groovy configuration in Grails applications

1. Introduction:

In grails, when our resources.groovy file is growing then it is better to split some logical bean configuration with a separate file and import that file in resources.groovy.  For this, Grails provides a neat way to specify Spring bean definitions with its custom Beans DSL by using importBeans or loadBeans.

2. How to split resources.groovy

You can simply create resources file under  "grails-app/conf/spring/" package: e.g

firstBean.groovy:
beans {
  beanConfiguration: yourBeanConfiguration
}

3. Import external bean file

Grails provide importBeans or loadBeans to import custom external bean file which can be done inside resources.groovy as bellow:
beans = { 
  importBeans('file:grails-app/conf/spring/firstBean.groovy') 
}

The problem is that this seems to work, but only if you run the application via  grails run-app with the embedded servlet container.

As soon we create a WAR file and deploy it into tomcat we are getting into trouble. The problem is Spring Bean Configuration file is moved on the different folder in tomcat "WEB-INF/classes/spring/" so we can get file-not-found-exception.

In order to resolve this problem, we need to locate custom resource path in resources.groovy.
def loadFromFile = { name ->
        importBeans("file:grails-app/conf/spring/"+name)
    }

    def loadFromWar = { name ->
        def resource = application.parentContext.getResource("WEB-INF/classes/spring/"+name)
        loadBeans(resource)
    }
    def loadResource = application.isWarDeployed() ? loadFromWar : loadFromFile

    loadResource "firstBean.groovy"
    loadResource "secondBean.groovy"


Here if the application is running via grails run-app then it will use the path "grails-app/conf/spring/". And if it is via external tomcat with deploying the WAR file then it uses the path "WEB-INF/classes/spring/".

Note: Be sure that your resource file is packaged on WAR with the right path.
Share:

How to resolve grails-resolving-server-failed-to-start-for-port-8080-address-already-in-use

On Linux:

step1: if your server port already running at port 8080 then, firstly we have to kill this process for this open your terminal and type

lsof -w -n -i tcp:8080

which shows all the list of open file which is running at port 8080. if you type
lsof -w -n -i tcp:9090 if your server is running with port 9090 which shows all the list of open file which are running at port 9090. Here, lsof stand for ls = list and of = opened file. You can see list with pid number.


step2: type sudo kill -9 6911 where 6911 is pid number. Here 9 has its own meaning which is defined as kill command "SIGKILL" you can see this by type in terminal as kill -l . You can use -SIGKILL instead of -9.

step3: run your application. 

On Windows:

- Open and run command prompt as administrator and type following command:
   
   netstat -ano | findstr :8080

This command will find and list the process that uses this port.

Now, we need to kill the process, for this use following command:

   taskkill /pid 5884 /f

Where 5884 is the PID number. Use your PID number which is obtained previously.
Share:

Saturday, December 18, 2021

How to change Grails App server port in application.yml

This is a quick tutorial on how to set server port while running grails application. By default, grails will use the embedded tomcat server running on port 8080.

Sometimes if another process is using port 8080 then we might get a port address already in use error.

So, what we will do is to change the default port in the config. In grails 3.x version we can set up the custom port inside application.yml file.

Inside application.yml file lets add the following config setup to override the default port 8080.
server:
    port : "8090"
Now if we run the application, it will run on port 8090. 

If we want to configure the setup within the environment then we can do as below:
environments:
    development:
        server:
            port : "8090"
This will set the server port only for the development environment. Re-run the application.
Share:

Sunday, November 21, 2021

Error occurred running Grails CLI: No profile found for name [web]. (Use --stacktrace to see the full trace)

In grails application, the error mentioned below might occur.


Error |
Error occurred running Grails CLI: No profile found for name [web]. (Use --stacktrace to see the full trace)

Process finished with exit code 1
This might be of different reason. Let's try to fix it by deleting the build folder under the application and re-run the application. 

This might work in most cases if this doesn't help then try to clean the app. 

If you are using the command line then type the following command to clean the application.
grails clean
if you are using the IntelliJ idea then Ctr+Alt+G opens the command window and use the following command.
clean
Now, re-run the app.
Share:

How to configure multiple database in Grails application

In this tutorial, we are going to learn how to configure multiple databases in the grails 3.x application. This is necessary when you are dealing with multiple databases from the same application especially when dealing with an existing remote database. We are using different MySql databases for testing.

Let's create three MySql databases called db_default, db_one, db_two. Let's look into the application.yml file to configure the different databases and we will do it for the development environment, in other environments, the procedure will be the same.


environments:
    development:
        dataSource:
            dbCreate: update
            url: jdbc:mysql://localhost:3306/db_default
            driverClassName: com.mysql.jdbc.Driver
            dialect: org.hibernate.dialect.MySQL5InnoDBDialect
            username: root
            password: root
Here, we are setting the default database as db_default. So for this database, all the gorm queries will be the same as in a normal application.

Now, let's set up for other two databases.
        dataSources:
            first:
                dialect: org.hibernate.dialect.MySQLInnoDBDialect
                driverClassName: com.mysql.jdbc.Driver
                username: root
                password: root
                url: jdbc:mysql://localhost:3306/db_one
                dbCreate: update
            second:
                dialect: org.hibernate.dialect.MySQLInnoDBDialect
                driverClassName: com.mysql.jdbc.Driver
                username: root
                password: root
                url: jdbc:mysql://localhost:3306/db_two
                dbCreate: update

For more than two, we need to define the databases by defining dataSources and giving the corresponding names. Here the custom name is whatever name you want. We are giving the name first for db_one and second for db_two.

The overall implementation for application.yml file looks as below:
environments:
    development:
        dataSource:
            dbCreate: update
            url: jdbc:mysql://localhost:3306/db_default
            driverClassName: com.mysql.jdbc.Driver
            dialect: org.hibernate.dialect.MySQL5InnoDBDialect
            username: root
            password: root
        dataSources:
            first:
                dialect: org.hibernate.dialect.MySQLInnoDBDialect
                driverClassName: com.mysql.jdbc.Driver
                username: root
                password: root
                url: jdbc:mysql://localhost:3306/db_one
                dbCreate: update
            second:
                dialect: org.hibernate.dialect.MySQLInnoDBDialect
                driverClassName: com.mysql.jdbc.Driver
                username: root
                password: root
                url: jdbc:mysql://localhost:3306/db_two
                dbCreate: update
Now, how we can use the domain classes for the specific databases. Let's create a simple domain class called Book.groovy.
class Book {
    String title
    
    static mapping = {
        datasource 'first' 
    }
}
In the above example, the Book table is mapped to the db_one database so all operations regarding this will be in db_one database. Similarly, we can map the second database as well. We can map the single domain to multiple databases as below:
class Book {
    String title
    
    static mapping = {
        datasources([ConnectionSource.DEFAULT, 'first', 'second'])
    }
}
In the above example, the Book domain will be available in all the databases.

Now, let's look into how we can query for the specific database.

The first DataSource specified is the default when not using an explicit namespace, so in this case, the default one is used. But you can call GORM methods on the 'first' or 'second' DataSource with the DataSource name, for example:
def book = Book.first.get(1) // this will get from db_one
book.first.save() //this will save in db_one
def book = Book.second.get(1) // this will get from db_two
book.second.save() // this will save in db_two
def book = Book.get(1) // this will get from db_default
book.save() // this will save in db_default

We can use groovy native SQL as well. Let's look at the example. 
import grails.transaction.Transactional
import groovy.sql.Sql
import org.springframework.beans.factory.annotation.Autowired
import org.springframework.beans.factory.annotation.Qualifier

import javax.sql.DataSource

@Transactional
class DbOneService {

    @Autowired
    @Qualifier('dataSource_first')
    DataSource dataSource

    def test() {
        def sql = new Sql(dataSource)
        def rows = sql.rows("select * from....")
        println "rows: "+rows
    }
}
Here, we are creating the DbOneService which is annotated with Qualifier where the db_one database name is configured as dataSource_first. This will provide the db_one database connection to do DB operation. You can simply execute the native SQL command as shown above. Similarly, we can do the same for the second database called db_two.
import grails.transaction.Transactional
import groovy.sql.Sql
import org.springframework.beans.factory.annotation.Autowired
import org.springframework.beans.factory.annotation.Qualifier

import javax.sql.DataSource

@Transactional
class DbTwoService {

    @Autowired
    @Qualifier('dataSource_second')
    DataSource dataSource

    def test() {
        def sql = new Sql(dataSource)
        def rows = sql.rows("select * from....")
        println "rows: "+rows
    }
}
This way, we can deal with multiple databases.
Share:

Friday, January 1, 2021

How to use static content in app root directory in grails

In Grails latest version, it provides static assets management mechanism. You can use different files under the corresponding folders.


All the images will go under the images directory, js files go under the javascripts directory and CSS goes under the stylesheets directory. These files will be accessed by the URL path start with "/assets/".

Now, what if you don't want to use this structure or need to use the root path for some static file content.

For this, grails provide another option to manage static resources. So, what you can do is create the /resources/public directory under /src/main/ and use static resources there.


For example, if you had a file under /src/main/resources/public/images/example.jpg path then you can access that file using https://example.com/static/images/example.jpg.

This means, your file can be accessed with "/static/" URL by default.

If you want to access the file in the app root directory, setup the following configuration under application.groovy

grails.resources.pattern = '/**'

Now, for the above example the file can be accessed with https://example.com/images/example.jpg URL and if the file is in /public/ directory that file can be accessed with root path https://example.com/file.js
Share:

Tuesday, June 2, 2020

Hot reloading the resources file for changes in Grails.


How to hot reload the resources file when the changes happened in Grails.


I was working on Grails 3.3.0 and hot reloading was not working while changing in the resources files. So, I found some workaround which is worth sharing here. There are the following steps to resolve the issue.

  1. Configure to watch the directory.
  2. Watch the directory for code changes
  3. Reload spring resources config
  4. Load from the application

Configure to watch the directory:


Here I am creating a class BeanWatcher.groovy to watch the config file changes.


import grails.spring.BeanBuilder
import grails.util.Environment
import grails.util.Holders
import groovy.util.logging.Slf4j
import org.grails.core.exceptions.GrailsConfigurationException
import org.grails.spring.DefaultRuntimeSpringConfiguration
import org.grails.spring.RuntimeSpringConfigUtilities
import org.springframework.beans.factory.support.BeanDefinitionRegistry

import java.nio.file.FileSystems
import java.nio.file.FileVisitResult
import java.nio.file.Files
import java.nio.file.Path
import java.nio.file.SimpleFileVisitor
import java.nio.file.StandardWatchEventKinds
import java.nio.file.WatchEvent
import java.nio.file.WatchKey
import java.nio.file.WatchService
import java.nio.file.attribute.BasicFileAttributes
import java.util.concurrent.atomic.AtomicBoolean
    
    class BeanWatcher extends Thread{
    
    
    private final WatchService watchService
    private long sleepTime = 1000
    private AtomicBoolean stop = new AtomicBoolean(false)
    
    public BeanWatcher(Path path){
        watchService = FileSystems.getDefault().newWatchService()
        walkAndRegisterDirectories(path)

    }
    

    private void walkAndRegisterDirectories(final Path start){
        // register directory and sub-directories
        Files.walkFileTree(start, new SimpleFileVisitor<Path>() {
            @Override
            public FileVisitResult preVisitDirectory(Path dir, BasicFileAttributes attrs){
                registerDirectory(dir)
                return FileVisitResult.CONTINUE
            }
        })
    }
    

    private void registerDirectory(dir){

        dir.register(
                watchService,
                StandardWatchEventKinds.ENTRY_MODIFY)
    }
    
    
     @Override
    void run() {

       
    }
    
     static void configureBeanWatcher(){
        Environment environment = Environment.current
        File baseDir = new File(environment.getReloadLocation()).canonicalFile
        String location = baseDir.canonicalPath
        File watchDir = new File(location, "grails-app/conf/spring")
        Path path = watchDir.toPath()
        BeanWatcher beanWatcher = new BeanWatcher(path)
        beanWatcher.start()
    }
    
    
    }

I want to watch the config spring file so I provided the path: "grails-app/conf/spring" under the project directory. As we are running in the thread so the current thread will not be interrupted for each time file changes. Here, we are registering directories and sub-directories.


Watch the directory for code changes:

    @Override
    void run() {

        try {
            WatchKey key
            try {
                while ((key = watchService.take()) != null) {
                    List<WatchEvent <?>> watchEvents = key.pollEvents()
                    for (WatchEvent <?> event : watchEvents) {
                        WatchEvent.Kind <?> kind = event.kind()
                        WatchEvent <Path> pathWatchEvent = cast(event)
                        Path name = pathWatchEvent.context()
                        Path dir = (Path) key.watchable()
                        Path child = dir.resolve(name).toAbsolutePath()
                        File childFile = child.toFile()
                        if(kind == StandardWatchEventKinds.ENTRY_MODIFY){
                            onChange(childFile)
                        }
                    }
                    key.reset()
                }
            } catch (InterruptedException e) {
                e.printStackTrace()
            }
        } catch (IOException e) {
            e.printStackTrace()
        }

    }
        

    @SuppressWarnings("unchecked")
    private static <T> WatchEvent<T> cast(WatchEvent<?> event) {
        return (WatchEvent<T>)event
    }
        
The above code will listen to the file changes and call the method onChange for each time the file changes. Now, it's time to reload our resources file while changes occurred.


Reload spring resources config:

   private static void onChange(File file) { // the changed file 
        processBeanDefinitionRegistry()
    }
    
    public static void processBeanDefinitionRegistry(){
        def springConfig = new DefaultRuntimeSpringConfiguration()
        def application = Holders.grailsApplication
        def context = application.mainContext
        def beanResources = context.getResource(RuntimeSpringConfigUtilities.SPRING_RESOURCES_GROOVY)
        if (beanResources?.exists()) {
            def gcl = new GroovyClassLoader(application.classLoader)
            try {
                RuntimeSpringConfigUtilities.reloadSpringResourcesConfig(springConfig, application, gcl.parseClass(new GroovyCodeSource(beanResources.URL)))
            } catch (Throwable e) {
                throw new GrailsConfigurationException("Error loading spring/resources.groovy file: ${e.message}", e)
            }
        }
        def bb = new BeanBuilder(null, springConfig, application.classLoader)
        bb.registerBeans((BeanDefinitionRegistry)application.getMainContext())
    }


This is the code snippet that I found in the grails where they used to reload the file. This will reload and re-configure the resources file.


Load from the application:

We set up all the necessary config and necessary code inside BeanWatcher.groovy now lets load the file from application for this add the following code.

Application.groovy

    if (Environment.current == Environment.DEVELOPMENT){
            BeanWatcher.configureBeanWatcher()
        }
    
This is only for the development env so we did the same.
Share:

Sunday, March 19, 2017

How to create facebook messenger bot part 2

Setup Welcome Screen For Greeting Text and Get Started Button 

This will be the welcome screen for the new conversation. It will appear only for the first time. This will be similar like this.


For this, we have to make the post request. I am using postman for the post request, you can simply add postman extension in your chrome.

Example
curl -X POST -H "Content-Type: application/json" -d '{
  "setting_type":"greeting",
  "greeting":{
    "text":"Welcome to shopping bot" //you can text whatever you want
  }
}' "https://graph.facebook.com/v2.6/me/thread_settings?access_token=PAGE_ACCESS_TOKEN"   // PAGE_ACCESS_TOKEN = previously generated page access token
  1. Select Post option from drop down of a postman. Enter request url = https://graph.facebook.com/v2.6/me/thread_settings?access_token=PAGE_ACCESS_TOKEN
  2. In headers tab set key=Content-Type and value=application/json
  3. In body tab select raw radio button and enter 
{
  "setting_type":"greeting",
  "greeting":{
    "text":"Welcome to shopping bot" 
  }
}
After sending you can see output as
{
  "result": "Successfully updated greeting"
}
Similarly, you can set for get started button.

Example


curl -X POST -H "Content-Type: application/json" -d '{
  "setting_type":"call_to_actions",
  "thread_state":"new_thread",
  "call_to_actions":[
    {
      "payload":"InitialPayload"
    }
  ]
}' "https://graph.facebook.com/v2.6/me/thread_settings?access_token=PAGE_ACCESS_TOKEN"      
After setting you can see like

After click Get Started button you can see JSON format where we check for "IntialPayload" in order
"postback": {
                        "payload": "InitialPayload"
                    }
to replay some message for that user.

Now it's time to handle JSON format.
Here we are going to create Class for each object.


MessageRequest.java


public class MessageRequest {
    String object;
    List<entry> entry = new ArrayList<entry>();

    public String getObject() {
        return object;
    }

    public void setObject(String object) {
        this.object = object;
    }

    public List<entry> getEntry() {
        return entry;
    }

    public void setEntry(List<entry> entry) {
        this.entry = entry;
    }
}

Entry.java
public class Entry {
    String id;
    String time;
    List<messaging> messaging = new ArrayList<messaging>();

    public String getId() {
        return id;
    }

    public void setId(String id) {
        this.id = id;
    }

    public String getTime() {
        return time;
    }

    public void setTime(String time) {
        this.time = time;
    }

    public List<messaging> getMessaging() {
        return messaging;
    }

    public void setMessaging(List<messaging> messaging) {
        this.messaging = messaging;
    }
}


Sender.java
public class Sender {
    String id;

    public String getId() {
        return id;
    }

    public void setId(String id) {
        this.id = id;
    }
}
Recipient.java
public class Recipient {
    String id;

    public String getId() {
        return id;
    }

    public void setId(String id) {
        this.id = id;
    }
}
Message.java
public class Message {
    String mid;
    String seq;
    String text;
    Long stickerId;
    List<attachment> attachments;
    Attachment attachment;
    QuickReplies quick_reply;
    List<quickreplies> quick_replies;
    public String getMid() {
        return mid;
    }

    public void setMid(String mid) {
        this.mid = mid;
    }

    public String getSeq() {
        return seq;
    }

    public void setSeq(String seq) {
        this.seq = seq;
    }

    public String getText() {
        return text;
    }

    public void setText(String text) {
        this.text = text;
    }

    public Long getStickerId() {
        return stickerId;
    }

    public void setStickerId(Long stickerId) {
        this.stickerId = stickerId;
    }

    public List<attachment> getAttachments() {
        return attachments;
    }

    public void setAttachments(List<attachment> attachments) {
        this.attachments = attachments;
    }

    public Attachment getAttachment() {
        return attachment;
    }

    public void setAttachment(Attachment attachment) {
        this.attachment = attachment;
    }

    public QuickReplies getQuick_reply() {
        return quick_reply;
    }

    public void setQuick_reply(QuickReplies quick_reply) {
        this.quick_reply = quick_reply;
    }

    public List<quickreplies> getQuick_replies() {
        return quick_replies;
    }

    public void setQuick_replies(List<quickreplies> quick_replies) {
        this.quick_replies = quick_replies;
    }

    
}

Postback.java
public class Postback {
    String payload;
    Referral referral;
    public String getPayload() {
        return payload;
    }

    public void setPayload(String payload) {
        this.payload = payload;
    }

    public Referral getReferral() {
        return referral;
    }

    public void setReferral(Referral referral) {
        this.referral = referral;
    }

}

Referral.java
public class Referral {
    String ref;
    String source;
    String type;

    public String getRef() {
        return ref;
    }

    public void setRef(String ref) {
        this.ref = ref;
    }

    public String getSource() {
        return source;
    }

    public void setSource(String source) {
        this.source = source;
    }

    public String getType() {
        return type;
    }

    public void setType(String type) {
        this.type = type;
    }
}


Attachment.java
public class Attachment {
    String type;
    Payload payload;

    public String getType() {
        return type;
    }

    public void setType(String type) {
        this.type = type;
    }

    public Payload getPayload() {
        return payload;
    }

    public void setPayload(Payload payload) {
        this.payload = payload;
    }
}
QuickReplies.java
public class QuickReplies {
    String content_type;
    String title;
    String payload;

    public String getContent_type() {
        return content_type;
    }

    public void setContent_type(String content_type) {
        this.content_type = content_type;
    }

    public String getTitle() {
        return title;
    }

    public void setTitle(String title) {
        this.title = title;
    }

    public String getPayload() {
        return payload;
    }

    public void setPayload(String payload) {
        this.payload = payload;
    }
}
Messaging.java
public class Messaging {
    Sender sender;
    Recipient recipient;
    String timestamp;
    Message message;
    Postback postback;
    Referral referral;

    public Sender getSender() {
        return sender;
    }

    public void setSender(Sender sender) {
        this.sender = sender;
    }

    public Recipient getRecipient() {
        return recipient;
    }

    public void setRecipient(Recipient recipient) {
        this.recipient = recipient;
    }

    public String getTimestamp() {
        return timestamp;
    }

    public void setTimestamp(String timestamp) {
        this.timestamp = timestamp;
    }

    public Message getMessage() {
        return message;
    }

    public void setMessage(Message message) {
        this.message = message;
    }

    public Postback getPostback() {
        return postback;
    }

    public void setPostback(Postback postback) {
        this.postback = postback;
    }

    public Referral getReferral() {
        return referral;
    }

    public void setReferral(Referral referral) {
        this.referral = referral;
    }
}

Element.java

public class Element {
    String title;
    String subtitle;
    String image_url;
    List<Button> buttons;

    public String getTitle() {
        return title;
    }

    public void setTitle(String title) {
        this.title = title;
    }

    public String getSubtitle() {
        return subtitle;
    }

    public void setSubtitle(String subtitle) {
        this.subtitle = subtitle;
    }

    public String getImage_url() {
        return image_url;
    }

    public void setImage_url(String image_url) {
        this.image_url = image_url;
    }

    public List<Button> getButtons() {
        return buttons;
    }

    public void setButtons(List<Button> buttons) {
        this.buttons = buttons;
    }
}
Button.java
public class Button {
    String type;
    String title;
    String payload;
    String url;

    public String getType() {
        return type;
    }

    public void setType(String type) {
        this.type = type;
    }

    public String getTitle() {
        return title;
    }

    public void setTitle(String title) {
        this.title = title;
    }

    public String getPayload() {
        return payload;
    }

    public void setPayload(String payload) {
        this.payload = payload;
    }

    public String getUrl() {
        return url;
    }

    public void setUrl(String url) {
        this.url = url;
    }
}

Payload.java

public class Payload {
        String template_type;
        String text;
        List<element> elements;
    List<button> buttons;
    
    public String getTemplate_type() {
    return template_type;
    }
    
    public void setTemplate_type(String template_type) {
    this.template_type = template_type;
    }
    
    public String getText() {
    return text;
    }
    
    public void setText(String text) {
    this.text = text;
    }
    
    public List<element> getElements() {
    return elements;
    }
    
    public void setElements(List<element> elements) {
    this.elements = elements;
    }
    
    public List<button> getButtons() {
    return buttons;
    }
    
    public void setButtons(List<button> buttons) {
    this.buttons = buttons;
    }
    }

Now its time to reply some text when user click Get Started button. All the callback messages should be listen in POST request. Lets make one helper class for making format of message to send. Here I am going to make FacebookHelper.java.
def private processMessages(){
        //make post request as readable
        String payload = FacebookHelper.readRequest(request);
        //convert json format to java readable format
        MessageRequest messageRequest = new Gson().fromJson(payload,MessageRequest.class)
        List<messaging> messagings = messageRequest.entry.get(0).messaging;
        for (Messaging event:messagings){
            try {
                if (event.postback != null){
                    sendPostbackMessge(event);
                }
            }catch (Exception e){
                e.printStackTrace();
                response.status = 200;
                render(true);
                return ;
            }

        }
        response.status = 200;
        render(true);
    }


Here line 3 will convert the JSON post request format to readable form which we will create in FacebookHelper.java.
public class FacebookHelper {

public static String readRequest(HttpServletRequest request){
        String line = null;
        StringBuffer stringBuffer = new StringBuffer();
        try {
            BufferedReader bufferedReader = request.getReader();
            while ((line = bufferedReader.readLine())!=null){
                stringBuffer.append(line);
            }
        }catch (Exception e){
            e.printStackTrace();
        }
        return stringBuffer.toString();
    }
}
Line 9 check wheather the callback message is postback or not. If it is postback message then it will call sendPostbackMessge() method for checking and reply message.


private static sendPostbackMessge(Messaging event){
        List<string> postbackReplies =  testAndGetPostBackReplies(event)
        if (postbackReplies.size()>0){
            for (String postrep:postbackReplies){
                FacebookHelper.sendPostRequest(postrep);
            }
        }
    }

private static testAndGetPostBackReplies(Messaging event){
        List<string> postback = new ArrayList();
        String payload = event.postback.payload
        switch (payload){
            case "InitialPayload":
               postback = FacebookHelper.getInitialPostbackTemplate(event)
                break;
        }
        return postback
    }


public class FacebookHelper {
public static List<string> getInitialPostbackTemplate(Messaging event){
        List<string> replies = new ArrayList<string>();
        Message message = getMessage("Hello how can i help you?");
        String jsonReply = getJsonReply(event.getSender().getId(),message);
        replies.add(jsonReply);
        return replies;
    }
}


private static Message getMessage(String messg){
        Message message = new Message();
        message.setText(messg);
        return message;
    }


private static String getJsonReply(String senderId, Message message){
        Recipient recipient = new Recipient();
        recipient.setId(senderId);
        Messaging reply = new Messaging();
        reply.setRecipient(recipient);
        reply.setMessage(message);
        String replyJson = new Gson().toJson(reply);
        System.out.println("reply json------------------"+replyJson);
        return replyJson;
    }


getJsonReply method simply convert reply message in Json Format to post to client. In order to send message you have to call sendPostRequest() method.

public static String sendPostRequest(String payload){
        StringBuffer jsonString;
        try {
            URL url = new URL("https://graph.facebook.com/v2.6/me/messages?access_token=YOUR-PAGE-ACCESS-TOKEN");
            HttpURLConnection connection = (HttpURLConnection) url.openConnection();

            connection.setDoInput(true);
            connection.setDoOutput(true);
            connection.setRequestMethod("POST");
            connection.setRequestProperty("Accept", "application/json");
            connection.setRequestProperty("Content-Type", "application/json; charset=UTF-8");
            OutputStreamWriter writer = new OutputStreamWriter(connection.getOutputStream(), "UTF-8");
            writer.write(payload);
            writer.close();
            BufferedReader br = new BufferedReader(new InputStreamReader(connection.getInputStream()));
            jsonString = new StringBuffer();
            String line;
            while ((line = br.readLine()) != null) {
                jsonString.append(line);
            }
            br.close();
            connection.disconnect();
        } catch (Exception e) {
            throw new RuntimeException(e.getMessage());
        }
        return jsonString.toString();

    }


Now you can see the output when Get Started button is clicked for the first time.


In the next tutorial we will create a final shopping bot, which have image attachment, buttons, quick replies button, option menu and payment system.

Share:

Monday, March 6, 2017

How to create facebook messenger bot part 1

Facebook gives the large platform for the messenger. In this tutorial series, we are going to create our own facebook messenger bot.  Please refer facebook developer messenger platform here for the documentation. We are going to create simple messenger bot for shopping.


Step 1: The first thing is to create a facebook app and page if you don't have. so let's create facebook app and page.


Click to create the app and fill the pop up modal and create app id. This will create the page with app id number. Here click +add product to add messenger.


Now create facebook page of your own which is the identity of your bot so, include the appropriate name and image for the page. 

Step 2: Setup Webhook

In order to get the update or handle and process the messages of conversation between bot and the client, we required to setup callback Url to process messages. With the live server its fine but we have to develop on the local server, as our local server is not a live one so we have to tunnel our local server to live one. For this, we are using ngrok. Please refer my youtube video to set up ngrok.


Create bot application in your editor, run the application and tunnel it using ngrok. The tunneled url will be similar like this http://849ac456.ngrok.io/. 


1.Generate a page access token: Use the page created to generate page access token.


2.Setup Webhook(Callback URL):


Here callback ULR is where we process post and get request. we need to verify this token later. Subscription field messages is subscribed to get the update when the message has been sent to your page and messaging_postback is for postback replies. In order to verify we need to write verify code in the get request of callback URL.

class MessengerController {

   def verifyAndProcess(){
        if (request.getMethod() == 'GET'){
            if (request.getParameter('hub.mode') == 'subscribe' &&
                    request.getParameter('hub.verify_token') == "bot") {
                log.info("Validating webhook");
                response.setStatus(200)
                 render(request.getParameter('hub.challenge'))
            } else {
                log.error("Failed validation. Make sure the validation tokens match.")
                response.setStatus(403)
                render(false)
            }
        }else {
            processMessages() //for processing messages
        }

    }
}
Finally, click verify and save. Here I am using grails application if you are using servlet then you have to verify it in doGet method and process post request message in doPost method.

Now you have to subscribe your page.


Step 3: Create link to messenger
In order to chat with a bot, we have to simply provide the link to the messenger for this use following view.
<div class="jumbotron">
<div class="container">
<div class="page-header">
<h1>
Messenger Chat bot</h1>
</div>
<div class="fb-messengermessageus" color="blue" messenger_app_id="your app-id" page_id="your PAGE_ID" size="standard">
</div>
</div>
</div>
<script>

    window.fbAsyncInit = function() {
        FB.init({
            appId: "1201209609977381", //your app-id
            xfbml: true,
            version: "v2.6"
        });

    };

    (function(d, s, id){
        var js, fjs = d.getElementsByTagName(s)[0];
        if (d.getElementById(id)) { return; }
        js = d.createElement(s); js.id = id;
        js.src = "//connect.facebook.net/en_US/sdk.js";
        fjs.parentNode.insertBefore(js, fjs);
    }(document, 'script', 'facebook-jssdk'));

</script>


If you type some text in messenger after clicking message us button you  can see post response in ngrok history console as bellow.


In the next tutorial, we are going to learn how to handle this JSON format and make a bot to reply.


Share: